http://lunaticswithlemonade.deviantart.com/
The group I cosplay in! Please visit our page!
Showing posts with label Cosplay tips. Show all posts

Friday, 13 September 2013

Cosplay Amour tutorial part 2

Wow so here's part 2 of the Armour tutorial!! Here we go.

 Now is the hardest and  most annoying part. Attaching your armour. I opted for poppers to give the armour a more 3D look. This meant getting Bal to mark on where each popper will join. I then had to sew all these poppers on the dress by hand WHICH IS VERY TEDIOUS. You can opt for velcrow, but it may not stick with heavy armour. If you're lucky, your armour may easily attach by just being tied on/you could glue it to a base.
 Now add poppers if you're connecting/putting on your armour that way. I used poppers as the armour
over laps so I didn't want it to look flat. The poppers raise the levels a little

This is what the muslin looks like wet

 Sealing the craft foam can take some time. I managed to do it during a week where I had nothing better to do all day. I mixed 3 parts pva with 2 parts water and painted it on. The less water the longer it'll take to dry. I just painted on a coat and went and did something else. It was usually dry after an hour or two. Depending on the amount of glue you add + how well you want it sealed then I'd reccommend 5 layers if you add lots of glue or up to 20 if you thin it out. Be careful as adding lots of glue at once means it's harder to control how much you seal it and you may end up with less flexible armour. It's essential for me that my armour bends as it curves around my waist, and even shaped in the oven a thick layer of glue will cause the craft foam to fold and not bend smoothly.
  Paint the underside if you feel it may be visible from certain angles. White muslin contrasting with your gold/silver/black etc armour is gonna look really weird.
 You are going to need a lot of paint if you're doing armour. I am also doing a lot of armour pieces so I went to a craft store and picked up a big tube on offer!
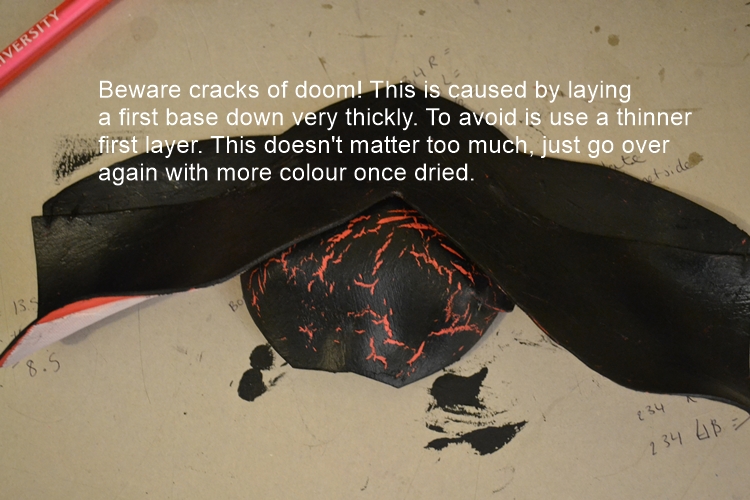
 As some of my craft foam was a different colour I had to paint it black. This isn't super necessary although I'd reccommend it if you have time. The thing to remember is to paint it in thin layers until the colour is what you want. I managed to paint it on thickly creating cracks in the acrylic as it dried. These however, can easily be painted over again to get rid of.
 Painting the armour is easy enough. I think it was the funnest part. I simply painted on red metallic acrylic, then painted on gold acrylic - mixing the two together as I did. Then I took a large paintbrush and almost 'stippled' on the black. If you want any two colours to mix/blend together then this should be done when wet. Mixing all 3 together gave the effect I wanted, which was a metallic dark gold/bronze.
 Many people weather the pieces with black acrylic. You can dab it on and smudge it with a sponge, fingers or anything really. Just be gentle. This armour doesn't really have many 'weathering points'. Most of the armour is flat. Embossing and dents look great when weathered.

 It may seem weird but floor wax is a good and cheap sealer. I used pledge, which I picked up from my local super market for £3.60 for a whole bottle. It's easy to use, dries quickly and doesn't ruin your paintbrushes! 
It depends what type of end look you want. Wax doesn't show up much, but if you are looking for a glossy finish then use some acrylic varnish which comes in satin, matte and glossy. A word of warning though, Acrylic varnish will ruin your paintbrush no matter what.
 I couldn't stress this last part enough! Make sure you test the wax doesn't strip away the acrylic
paint. That's why Multi-surface wax is the best. Don't forget to be gentle too. A soft paintbrush is ideal so you don't make any scratches.

Tuesday, 18 September 2012

Getting your skin clear for cosplay

Ok so I'm not gonna bore you with the usual. If you're reading this then you've probably read
a lot of other articles on how to clear up your poor skin. You know the usual drill: drink water, find the facewash to suit you, get sleep, eat your fruit and veggies etc. but I wanted to share with you personal tips.

1.) See a doctor
I have had acne since I can remember really and not a day has gone by since I first got it where I have not had a spot on my face. So that's since about 13 or 14. To begin with it was only mild, but at the age of 15 I was already getting cystic acne. I could feel it pushing it's ugly lump up through my face as I sat at school until when I was about 16 and got 11 cystic spots over 3 days. I cracked and went crying to my mum (who herself had acne until 35 when she took proaccutane (an extremely high does of vit.a)). She told me to go to the doctors and although it sounded silly after I went it was the best thing I could've done. They gave me antibiotics with zinc to apply to my face. At this time I was gettng acne around my mouth where to this day I still get painful acne there. This cleared it up until one day it decided to stop working...After that I tried oral antibiotics and cremes. You have to bear with the system as it is a gradual one. They put me on the pill for 3 months and it did nothing. However the doctor put me on for 3 more months and I'm glad they did because it is working really well (although atm I have a painful spot) because I changed my facewash. Facewash + pill and I had only rarely those small tiny spots which go away quickly and mean nothing if you've had to bear with any form of painful acne. The only problem with the pill is it actually intensified my period pains. I'd also like to mention as people think the pill increases cancer it does not really. For Dianette, in their study of 6000 women out of the 3000 not taking the pill 16 of them had breast cancer by the time they were 30, and out of the 3000 taking the pill 17 of them had breast cancer. It is also said to reduce certain cancers but idk what to think about that. But yes. The best thing I'd reccommend is go see a doctor! I felt so relieved just seeing one.

2.) What does your skin want?
I was confused about facewash. As my acne was large, inflammed and painful I though my skin was sensitive. But I was wrong. I noticed my sin was oily towards the end of the day and swapping from a thick, moisturising cream clenser for sensitive skin to a foam for sensitive oily skin made all the difference! So think about what your skin really wants. 

3.) Calm
It's not so much the appearance but the pain that spots cause. What appears small feels like a massive golf ball swelling in your face. You can try various creams to calm them but one remedy I have tried recently is mint, green tea! Using an organic (pepper)mint green tea  bag hold it under the warm tap them rest it on the painful area. I find the peppermint really soothes the area and green tea is also meant to be calming. I do this when I have just (ok it sounds gross) cleared out a massive painful spot (if you completely drain it may leave a scar but the pain is gone by the next day. I would not reccommend this though as it will leave scars).

4.) Food does not cause acne
It's true. So take out that chocolate bar it doesn't matter. But eating the right foods can help acne. Basically that's fruit and veg. Zinc helps skin as well as your vitamins so eating these will help your skin, but seriously there is no link between certain foods causing acne. It is mainly down to your genes (unless you have a habit of smearing butter all over your face which would be the cause).

5.) Follow all that other stuff
Of course yes it does help to drink water and get sleep. Sleep means more time for calm, healing and growing, whilst water means your body is not dehydrated and stressed out. A body that has is daily needs met has energy to repair and help itself. And that could be your skin! So eat enough & eat vitamin/mineral abundant food and drink plenty of water. According to the doctor stress does not effect your skin but we all know that's a lie. Try to avoid stress and try to smile (unless it hurts because of your acne D: you can just imagine a smile or think of fluffy kittens!). Oh and don't touch your face, it makes it hurt even more and irritates it! They mention bacteria spreading but tbh if bacteria is causing your acne then facewash would have sorted that out for you by now (all they do is create excess fatty acids which clog your pores, so if you wash your face at the beginning and end of day you should reduce their numbers enough to stop this). Umm and don't overwash your face. Also moisturiser is not essential if you have oily skin. I know they say oily skin is caused as it's not oiled enough, but moisturiser doesn't make a difference although if it does work for you then just keep at it! Exfoliation can help as well, but if you have lots of acne opt for a very gentle exfoliator. An exfoliator can help stop spots developing so you will notice a difference later on if you exfoliate maybe twice a week. It certainly helps in oily trouble areas if you get lots of small whiteheads/blackheads. If you have cystic/painful acne then just go gentle on these areas.


I hope this helps!

Tuesday, 7 August 2012

Cosplay tips: Beginner's sewing

For my next convention I will be sewing my own cosplay for the very first time. Being in LwL I have been fortunate enough to have Bal sew our costumes but it is no longer fair to do this so we are all sewing are own cosplays now. I have just started to sew mine and will be picking up my pattern, material & interfacing up on monday to start sewing :S I wanted to share with you any tips I've found useful so far for you beginner sewers!!

1.) The cosplay

Choosing your cosplay is a key part. You will want to choose something simple. I would not reccommend going all out (assuming you've never sewed before) and thinking you can handle it because most likely you won't be able to! I know this from experience! You'll need to first asses how easy the piece will be to make. Even easy looking cosplays may be hard to actually sew (what seems a simple skirt may be extremely complicated and require different sewing techniques). Trial and error is important. I originally wanted to do Senbonzakura Miku, but upon adding up how much it would cost I realised that it would extremely expensive despite it's simpler look. If you have someone to help you then go ahead and ask them if they think a certain cosplay will be easy to make. If you like elaborate costumes then maybe choose something with easy sewing but an impressive prop which would be easy although a little time consuming to make.

2.) Choosing a pattern

Don't run away the second you look at your pattern. It may have lines and jargon printed all over it but you can look these up, ask for help or figure it out yourself. You may not even need to use all the funny lines etc printed on your pattern. Before you choose your pattern try and think mentally if the picture looks like it has lots of componants that need sewing together and if the shape is quite complex as this will help you pick a simpler, easiser pattern. When choosing a pattern as well you may look in a pattern book in a shop. If doing this try and overlook the original purpose, colour or print of the pattern and imagine the basic outline. Is this the right shape? Will this work? For example; what was originally a granny-style suit turned into Bal's Seras dress! See here!
You can easily use a pattern just based on it's shape, not it's purpose/colour etc

3.) The buisiness of sewing

So you've got your pattern, material thread and any other things you need. Now it's time to sew it all together! STOP! Firstly, you need to get used to your own sewing machine (unless you plan to sew the whole thing by hand...). I took my sewing machine apart and couldn't get it back together for a whole hour. I had to find the pdf of the manual to my outdated sewing machine online after much finding. However I did learn how to change the base thread at the same time and in the end I worked out how to put it together myself as the manual was no use. You'll need to learn how to thread the bottom and top thread and try experimenting with the different types of stitch your machine is capable off. If you are a beginner then a steady pace will help you keep a good sewing line to avoid the threads getting tangled or worse: OIL ON YOUR THREAD D: I was sewing something white just today and I'm glad I did a quick practice on some scrap fabric as because I wasn't good at sewing (so kept jamming the threads etc.) there was oil on my white thread. Not good if you are sewing light or even white fabric.

I'd also recommend practicing hemming etc. on some scrap fabric. It takes a while to get used to your machine and to learn to sew in the line that you want! Remember as well that depending on your fabric you may need a different needle in your machine (special ones for thicker fabrics) and if the fabric is a different colour then don't forget to change both top and bottom threads. Unless you're going for multi-coloured because one colour is too mainstream. Books as well can be usefull (no, not for beating the crap out of the sewing machine in a moment of desparation). Books on sewing can be very informative on clearing up any jargon and showing you techniques and tips that you'll find usefull. I picked up a bit of an outdated sewing book from the library. It was free and it had pictures and plenty of information. So just go on down to your library and take a look!

Also if you wish to sew a pattern then do not just make it shorter. This may make it fall in the wrong way. You can google this but on your pattern there should be a special like that you fold along and this is the line to make it shorter! Also pay close attention to your pattern, it'll come with instructions on how to sew it. Read it over and over until you can map out in your head what you're going to do which'll stop you making silly mistakes. And google anything you don't understand :) 

4.) Tools

This is simple. You'll need pins and scissors of course. But other things might come in handy such as glue, tweesers, a lighter and tape. You might be able to burn any hems (but omg be careful don't set fire to your cosplay or anything else!) if you're too lazy or you messed up and forgot to hem a bit or if you forgot to hem something too you could try dabbing glue on the edges so it doesn't start fraying (this won't be noticable on small pieces like accessories or gloves). You never know what you will need so expect the unexpected (I had to use tape to tape some cardboard back onto the machine which kept the thread tension right).

5.) Time

It's a lot more time consuming than you think, especially if you are a super beginner like me! It took me half an hour just to sew a hair bow. So make sure you leave plenty of time if you're wearing your cosplay to a convention as you never know when you'll have lots of homework/work/problems/exams to deal with.

This is all I can think of so far, so I'll more with you when I come across them!

Sunday, 29 July 2012

Convention tips: Hot weather

I decided to do this post with all the hot weather we've been having here in the UK recently. I was reminded the other day of how hot MCM expo had been this May just gone and I wanted to share a few tips on how to survive in hot weather in cosplay or at a convention.


1. Makeup

Oh my god. This was my worse nightmare. I was walking around with my face sweating and it was horrible.
It wasn't until the second day that I discovered my saviour: Powder! I'm not one to use powder as it feels cakey to me. With powder you might want to apply it after your makeup and/or carry it around with you. I found it was great padded onto shiny patches as they were instantly mattified and I appeared less wilted and my shine was gone! You can pick powder up cheap (£5 or less) at a beauty shop and it last for a while. You don't really need an expensive one if you just wanted to remove spots of shine i.e. T-zone or chin. Experiement with them as well. I was lucky in that the powder I was using did not clog my pores. No matter how many layers I slapped on it didn't get cakey or cause irritation or acne. I just used Rimmel Stay Matte which worked a wonder. There are also blotting sheets you can use to blot excess oil off of skin.
As well as powder I would also recommend waterproof eyeliner. Unless you need to create a smoky look, stay away from Kohl. Even 'waterproof' Kohl will smudge in hot weather and you're better off using gel, liquid or felt tip.
Another way I have heard to ensure makeup stays is to apply hairspray over your face. This doesn't sound very safe though so I'd recommend picking up a proper makeup finishing spray.
If you are going out in the sun it would be a good idea to apply sun protection. Use one that protects against UVA and UVB. Face creams/bb cremes/foundations etc. that have 'spf' in them do not count as valid sun protection. They won't last as long as normal suncreams and there's no saying how much of them you actually have to apply and wether or not they protect against UVB as well. It's easy to take some non-greasy face sun cream and apply it, you might decided to use it like a moisturiser too.


2. Staying cool

Not as easy as it sounds. In a crowded convention venue it can be hard to stay cool amongst the bustling crowds of people. When we arrived at the convention my friends and I were quick to scout out the coolest places where we could go and rest once it got too hot. We also only visited the really busy crowded places for short times and drank plenty. Tiled places low down will be the coolest and if there is a nice breeze then you can just step outside. Let's not forget fans either. They sell them at the convention we usually attend and we usually end up picking one up by the end. These are good for keeping yourself cool whilst you walk around the crowded places (hand fans not massive motor ones).
We thought we had considered what we were wearing. It was suitable for cold or warm weather. But not hot. You can't really plan that far in advance but the most you can do is know that if it's in summer than you will want to cosplay something with minimal layers. It's also warmer inside due to the amounts of people, so make sure if you have a heavy/thick/furred/layered costume to keep cool and drink plenty of fluids.
Let's not forget your place of stay. You might wanna check it has more than one window, or a window which opens wider than a tiny fraction. You'll want to get as much sleep as possible to cope with trekking around the next day in the heat.


3. Staying fresh

It is hard after a long day to stay looking and smelling fresh. Make sure you apply plenty of deodorant, but during the day if you do feel you smell either spray some deodorant outside or if you're inside then use some nice body mist so as not to suffocate everyone around you. Or you could just pop to the loo and put on some roll on. As well as this, if you find you sweat then you might want to wear a vest top to absorb any sweat so it doesn't come off onto your cosplay.


Well I hope I covered most of the points. These are the important ones which I can remember, so hopefully they'll help you out too!